How to make soap at home
The creative and fulfilling process of making soap at home lets you personalize it to your tastes. Natural ingredients can be used to make homemade soap, which is free of harsh chemicals and kind to your skin. We will go over how to make soap at home in this thorough guide, giving you all the information you need to make soap bars that are both attractive and functional.
Knowing the Fundamentals of Soap Making
The process of making soap involves a chemical reaction known as saponification, in which fats or oils combine with sodium hydroxide (lye) to produce glycerin and soap. Through this process, lye and oils are turned into solid soap bars that nourish and cleanse the skin. It's critical to realize that lye is a caustic substance that should be handled carefully.
While there are many different types of oils and fats that can be used to make soap, shea butter, coconut oil, palm oil, and olive oil are popular choices. Different qualities, including hardness, lather, and moisturizing capacity, are contributed by each oil to the soap. For a satisfying final product, selecting the appropriate oils based on your needs is essential.
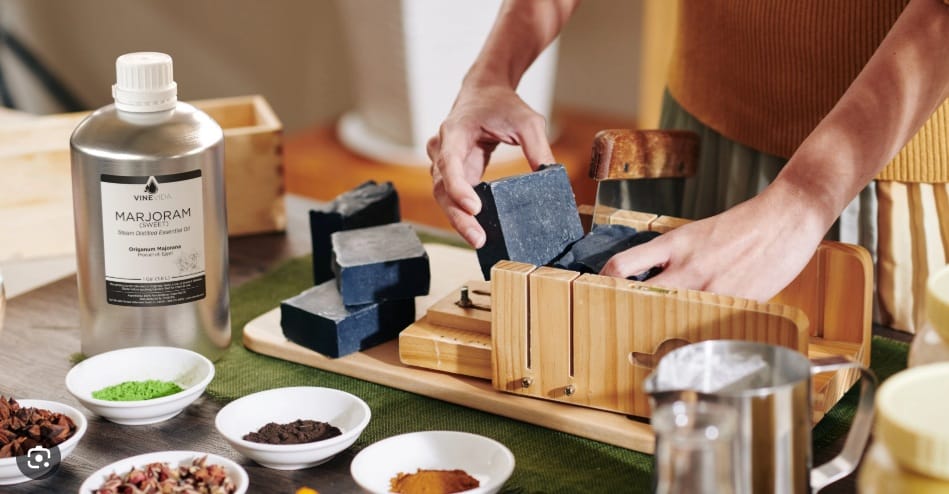
Getting Your Tools and Ingredients Together
It's crucial to gather all required ingredients and trustworthy tools before beginning the soap-making process. Lye, water, and oils or fats are the primary components required to make soap. Colorants, oatmeal or dried herbs for texture, and essential oils for fragrance are examples of optional ingredients.
Accuracy in soapmaking requires the use of precise measuring equipment. Safety and effectiveness will be guaranteed by a stick blender, rubber spatulas, a digital scale, mixing bowls (ideally made of stainless steel or heat-resistant glass), and protective equipment like goggles and gloves. It's also advised to shape your soap bars using molds.
Creating a Secure Work Environment
Because lye can burn people and release toxic fumes, safety is crucial when handling it. To prevent breathing in lye fumes, make sure your workspace has adequate ventilation. To avoid unintentional exposure, it's also best to keep kids and pets away from the workspace.
To reduce skin contact with lye, put on long sleeves, goggles, and protective gloves. Keep vinegar on hand to clean up any minor lye spills on surfaces. Maintaining a tidy and orderly workspace reduces the risk of mishaps and guarantees a seamless soap-making procedure.
Lye Solution Measurement and Mixing
Measuring your lye and water precisely is the first step in the procedure. Your recipe will determine the lye to water ratio. For optimal effects, use cold distilled water. Stir gently as you gradually add the lye to the water, not the other way around. This step must be completed outside or in a ventilated area because the mixture will heat up quickly and release fumes.
After the lye has completely dissolved, let the mixture cool to between 100 and 110°F (38 and 43°C). Cooling stops the lye from reacting too rapidly with oils, which could change the soap's texture and quality.
Getting the Oils Ready
Measure the oils and, if needed, reheat them while your lye solution cools. Warming oils a little bit facilitates their uniform mixing because some oils, such as coconut or palm oil, may solidify at room temperature. Avoid overheating or burning the oils by using low heat, like that found in a double boiler.
After all of the oils are liquid, let them cool until they are roughly the same temperature as your lye solution. The soap mixture won't seize or separate during blending if the temperatures are matched.
Mixing Oils and Lye Solution
It's time to mix your oils and lye solution once they've both cooled to between 100 and 110°F. To begin the saponification process, slowly pour the lye solution into the oils while stirring gently. To thoroughly mix the solution, use a stick blender, alternating between stirring and blending bursts.
As the soap forms, blending will make the mixture thicker. We refer to this thickened state as "trace." At trace, you can add colorants, fragrances, and other additives because the consistency is comparable to thin pudding.
Including Additives and Fragrances
After your mixture reaches trace, you can add exfoliants, natural colorants, or essential oils to personalize your soap. Essential oils, such as tea tree for its antimicrobial qualities or lavender for its calming effects, offer pleasant scents in addition to other skin benefits.
Vibrant colors are added by colorants like clays, activated charcoal, or powdered natural plants. Texture is added by exfoliants such as coffee grounds, oatmeal, or poppy seeds. Avoid overmixing these ingredients as this may break the trace. Instead, stir them evenly into the soap base.
Filling Molds with Soap
Pour the soap mixture into the molds that have been prepared after making the necessary adjustments. For easy removal, silicone molds are best, but freezer paper-lined wooden molds also work well. To level the soap and eliminate air bubbles, gently tap the molds on a surface.
To protect the soap while it saponifies and solidifies, cover the molds with a towel or plastic wrap. Insulation facilitates the process by retaining heat. For 24 to 48 hours, don't touch your soap.
Curing and Unmolding
It's time to unmold your bars after the soap has solidified. Remove the soap from the molds carefully; if it resists, give it more time to set. However, because the soap still has a high moisture content, it is not yet ready for use.
The soap must cure in a well-ventilated area for four to six weeks. Curing makes the bars harder and longer-lasting by allowing extra water to evaporate. Soaps should be kept on trays or racks with airflow. The soap undergoes saponification during this period, becoming gentle and skin-safe.
Advice for Producing Successful Soap
Making soap requires patience and accuracy. To guarantee correct saponification, always double-check your measurements and temperatures. Soap gets better with time, so don't rush the curing process.
Note down the types of oils, amounts, ingredients, and results of your recipes. This aids in formula refinement and the creation of your preferred blends. Gaining confidence as a soap maker includes learning from mistakes.
Common Errors to Steer Clear of
Using too much or too little lye, combining oils and lye at the wrong temperature, and hurrying the soap-curing process are some typical mistakes. While too little lye makes the soap soft or greasy, too much lye can make the soap harsh.
After adding additives and fragrances, avoid overmixing as this can change the texture. Additionally, make sure the molds are dry and clean because moisture can affect the consistency of the soap.
Advantages of Making Your Own Soap
In addition to saving money, making soap at home gives you control over the ingredients, which is beneficial for people with allergies or sensitive skin. Because homemade soaps preserve the glycerin that is naturally produced during saponification, they are frequently more nourishing and moisturizing.
Making soap is a fun hobby or possible side gig because you can customize scents or shapes and make one-of-a-kind gifts. Making your own skin care products gives you a great sense of fulfillment.
Examining Various Soap Types
Once you feel at ease using cold process soap, you can experiment with different methods of making soap. By cooking the soap, hot process soap accelerates saponification and reduces curing time.
Melt and pour soap is perfect for beginners because it involves melting premade soap bases and adding ingredients before molding. Every technique presents unique creative opportunities.
Effects of Homemade Soap on the Environment
Natural, biodegradable ingredients that are kinder to the environment than some commercial soaps are frequently used in homemade soaps. Synthetic preservatives and detergents that contaminate waterways and cause skin irritation can be avoided.
You can support eco-friendly living by selecting sustainable oils and packaging. Making soap at home allows you to recycle or reuse molds and containers, as well as reduce the amount of plastic waste from bottled soaps.
How to Keep Your Soap Molds Healthy
When soap molds are properly maintained, their useful life is prolonged. To avoid residue buildup, clean molds right away after use using warm water and mild soap. Steer clear of abrasive scrubbers and harsh chemicals that can harm wooden or silicone molds.
To stop mold from growing, make sure they are completely dry before storing. To ensure even wear and long-term use, rotate the molds while they are in use.
Solving Typical Problems
Working in hot temperatures or adding fragrance oils with additives may be the cause of your soap mixture seizing or hardening too quickly. The next time, try using cooler ingredients or mixing more slowly.
Oils may not be completely saponified if soap separates or appears greasy. Pay close attention to your lye concentration and usage. Bars that are soft or crumbly could be a sign of inadequate curing or lye.
How to Store Completed Soap
To maintain scent and color, store finished soap in a cool, dry location out of direct sunlight. To keep soaps safe from moisture and dust, store them in boxes or wrapped.
To prevent moisture from being trapped, which can lead to mold or softening, use breathable packaging, such as paper wraps or cloth bags. For ease of tracking, mark your soaps with ingredients and cure dates.
Making Your Own Soap
Once completely cured, your homemade soap bars are usually safe to use every day. To check for any skin reactions, start with small amounts. Rinse well after using soap and warm water.
Avoid overscrubbing because homemade soaps might be softer or gentler than store-bought ones. Between uses, keep soap on a draining soap dish to keep bars dry for optimal results.
Using Natural Ingredients to Improve Soap
Herbs, aloe vera, goat milk, honey, and other natural ingredients can add calming and restorative properties to your soap. You can add these ingredients to your melt-and-pour base or at trace.
Examine additive compatibility and usage percentages because certain natural ingredients may have an impact on shelf life or lather. Trying out different botanicals gives your soap recipes a luxurious and healthful touch.
Making Soap Bars That Are Ready to Give
Gifts of handmade soaps are both elegant and considerate. Reusable boxes, ribbons, and labels with personalized text can all be used to customize packaging.
Think about creating themed gift sets with complementary hues and fragrances. Gifts of handmade soap are not only lovely, but they also add a personal touch that loved ones value.
Making Soap for Business
Know your country's labeling regulations and ingredient disclosures if you want to make soap as a business. To attract customers, devote time to product photography, branding, and marketing.
Maintaining consistent batch notes and recipes is essential for quality control. Providing handmade, natural soaps reaches consumers who appreciate eco-friendly and artisan goods.
In conclusion
A fun craft that combines art and science is making soap at home. You can make your own lovely and useful soaps that suit your tastes with time, careful planning, and safety precautions. Homemade soap encourages creativity, sustainability, and wellness whether it is used for personal use, as a gift, or for commercial purposes.
You can create soap in countless ways by learning the fundamentals and experimenting with ingredients. Accept the process and savor the fulfilling results of creating your own soap bars.